
In Part 1, AI App Development with Base44: How to Build a Healthcare App Using Vibe Coding (Step-by-Step), Base44 generated MindCare, a patient-therapist scheduling app with search-and-book flows, a therapist dashboard, and seeded demo data. Part 1 ended with a follow-up prompt that added sign-up and sign-in. This post shows that prompt in full, and what it enforces beyond the login screen.
This tutorial covers how to deploy AI apps with Base44 the right way: auditing the build for what’s actually missing, adding Base44 role-based access, deciding whether to stay on Base44 or export, and deploying on your own infrastructure.
By the end of this post, you’ll have:
- Authentication and role-based access enforced on the backend, not just a login screen
- A clear decision framework for staying on Base44 versus exporting to your own infrastructure
- A concrete path for the export route: generating a backend, rebuilding the database, and deploying it
This is Part 2 of our Base44 series:
Part 1: AI App Development with Base44: How to Build a Healthcare App Using Vibe Coding (Step-by-Step)
Part 2: From AI Prototype to Production Ready: Deploy AI Apps with Base44
Part 3: How to Make a Base44 App HIPAA Compliant (Step-by-Step Guide for Vibe Coding)
Part 4: How to Build a Production-Ready HIPAA-Compliant App with Base44 (Vibe Coding Complete Guide)
Step 1: Ask ChatGPT to Audit the Build
Before writing a new prompt, we went back to ChatGPT (not Base44 directly), described the working Stage 1 build, and asked what that same Stage 1 would need for Base44 production deployment, without adding Stage 2 clinical features like intake forms or treatment plans.
The answer came back as a full production-readiness checklist, grouped into seven areas:
- Authentication & User Roles
- Therapist Onboarding & Verification
- Availability & Booking Engine
- Appointment Management & Notifications
- Security, Privacy & Compliance Foundation
- Admin, Monitoring & Infrastructure
- Testing, Accessibility & Launch QA
That’s a lot more than one team tackles in a single pass, and it should be, especially if the goal is to actually deploy AI apps with Base44 rather than just demo one. For this post, we only implemented the first area, Authentication & User Roles. The other six are real, valid next steps, not filler, and which ones you tackle next (and in what order) depends on your own launch timeline and risk tolerance. Therapist onboarding matters more if you have real therapists waiting to join; monitoring matters more the closer you are to real users. Treat the list above as a menu, not a mandatory sequence.
Step 2: Build Authentication and Base44 Role-Based Access
Of the seven areas, Authentication & User Roles is the one that has to come first regardless of what you tackle next, since nothing else on that list matters if a patient can access another patient’s data by editing a URL. Those roles have to be enforced on the backend, not just implied by the UI, or none of the rest of this list is worth doing.
This is also where HIPAA starts to matter. HIPAA’s technical safeguards include access controls, and role-based access is the usual way to meet them: a defined mapping of who can see which fields, not just which pages. Part 3 goes deeper on HIPAA; here, the point is that this work has to happen before production, not after.
Once Authentication & User Roles was picked as the priority, the follow-up ask to ChatGPT was short: give me a prompt for this that I can hand straight to Base44. What came back was considerably more detailed than that one-line ask, which is worth seeing in full rather than skimmed, so here’s what each part of it is doing.
Say what stays untouched before saying what to add
The prompt opens by naming the entire existing Stage 1 feature set and telling Base44 explicitly not to rebuild any of it. That single line is what stops a scope-focused request like this one from turning into an accidental full rewrite:
Base44 Prompt: Production-Ready Authentication & User Roles
Upgrade Stage 1: Production-Ready Authentication & User Roles

I already have a working Stage 1 MVP of MindCare, a mental-health
therapist discovery and appointment-booking platform.

The existing Stage 1 includes:
- Patient therapist search
- Therapist profiles
- Therapist availability
- Appointment booking
- Patient appointments
- Therapist dashboard
- Therapist appointment details

Do not rebuild or remove these existing features.

For this task, focus ONLY on making Authentication and User Roles
production-ready. Do not add Stage 2 clinical-record features.

1. Primary Goal

Replace any demo, hard-coded, or simulated login/role switching with a
proper authentication and authorization system using Base44's supported
native authentication capabilities.
- The system must securely distinguish between Patient and Therapist.
- The application should enforce permissions based on the authenticated
  user's identity and role.
- The UI should never be the only security layer.
Give each role its own path in, then lock the redirect to that role
Patients and therapists pick their role at sign-up, so the account already knows which one it is before login ever happens. That’s what makes “don’t let users pick a role after logging in” enforceable: there’s nothing left to pick.
2. User Authentication

Provide separate signup paths: "I'm a Patient" and "I'm a Therapist."

Patient signup fields:
- Full name
- Email
- Password
- Confirm password
- Phone number
- Agree to Terms of Service and Privacy Policy

Therapist signup adds:
- Professional title

Do not collect unnecessary clinical information during signup.

3. Login

Fields: email, password.
Include: Log In, Forgot Password, Create Account.

After successful authentication:
- Patients redirect to Find a Therapist
- Therapists redirect to Therapist Dashboard

Do not allow users to manually select a role after logging in; the role
comes from the authenticated account.
Password handling gets fully delegated, not built from scratch
Every instruction in this section points back to Base44’s own authentication system rather than a custom implementation. That’s deliberate: password storage and reset flows are exactly the kind of thing worth not reinventing, and saying so explicitly keeps Base44 from building a parallel, weaker version:
4. Email Verification

Implement email verification if supported by Base44's authentication
system. New users should verify their email before accessing protected
functionality.

Handle:
- Verification email
- Success
- Failure
- Expired link
- Resend

Use Base44's native implementation rather than a custom one.

5. Password Security

Use Base44's native secure password handling.

Do NOT:
- Store passwords in custom database fields
- Store plaintext passwords
- Expose passwords through frontend code
- Create a custom password system if Base44 already provides one

Implement:
- Password reset
- Secure handling
- Confirmation during signup
- Protection against repeated failed login attempts where supported

6. Forgot Password

Flow: Forgot Password → Enter Email → Reset Link → New Password → Login

Do not reveal whether an email belongs to an existing account. Use a
generic response like "If an account exists for this email, we'll send
you instructions to reset your password."
One profile table, one role, assigned exactly once
The user’s role gets set at signup and treated as fixed from then on, both technically and in the sentence that says so outright. No form, URL, or API request is allowed to change it later:
7. User Data Model

Use Base44 authentication as the source of truth for identity.

User Profile fields:
- id, auth_user_id, full_name, email, phone, role, profile_image,
  account_status, email_verified, created_at, updated_at

Role values: patient, therapist
Account status values: active, suspended, deactivated

Do not duplicate authentication credentials into the application
database.

8. Role Assignment

- Patient signup → patient
- Therapist signup → therapist

Users must NOT be able to change their role from the frontend, through a
form, URL parameter, API request, or dev tools. Do not create a public
role-change feature.
Routes get classified, but the backend is what actually enforces it
Sorting every route into public, patient-only, or therapist-only is the easy, visible part. The harder instruction sits right after it: none of that classification means anything unless the same check happens again on the server, independent of whatever the frontend decided to show or hide:
9. Route Protection

Public routes:
- Landing page
- Login
- Patient/therapist signup
- Password reset
- Email verification
- Public therapist discovery/profiles

Patient-only routes:
- Patient dashboard
- My Appointments
- Patient profile
- Booking actions

Therapist-only routes:
- Therapist dashboard
- Therapist appointments
- Therapist patient/appointment information
- Therapist profile management

10. Server-Side Authorization

Do NOT rely only on frontend route protection. Every protected
backend/database operation must verify:
- The user is authenticated
- The account is active
- The role allows the requested action
- The requested record belongs to or is associated with that user

A patient must NOT be able to request another patient's appointments by
changing an appointment ID. A therapist must NOT access another
therapist's appointments by changing a therapist ID.
Turn the permission rules into specific attack scenarios
Section 11 states the rules; section 12 rewrites each one as a scenario to actually try and block: a patient editing their own role, a patient swapping an appointment ID, a suspended account still trying to log in. A rule someone can name is easier to skip testing than a scenario someone can literally attempt:
11. Database Security Rules

Patients can:
- Read/update their own profile
- Read their own appointments
- Create appointments for themselves
- Cancel their own eligible appointments

Patients cannot:
- Read another patient's information
- Modify another patient's appointments
- Modify therapist data
- Modify appointment ownership
- Modify their own role

Therapists can:
- Read/update their own profile
- Read their own appointments
- Update eligible appointment statuses
- Access patient information only when legitimately associated with
  their appointment

Therapists cannot:
- Read another therapist's appointments
- Modify another therapist's profile
- Change appointment ownership
- Change their own role
- Access unrelated patients

12. Prevent Privilege Escalation

Explicitly test and prevent:
- A patient changing their own role to therapist (denied)
- A patient manually navigating to the therapist dashboard
  (denied/redirected)
- A patient changing an appointment ID to another patient's appointment
  (denied)
- A therapist changing a therapist ID to another therapist's (denied)
- An unauthenticated user accessing protected data (denied)
- A suspended user accessing the application (blocked)
Account lifecycle is separate from whether someone’s currently logged in
A suspended account and an expired session are two different problems with two different fixes, so the prompt keeps them as separate concepts rather than folding “blocked” into the same bucket as “logged out”:
13. Account Status

Support statuses: active, suspended, deactivated.
- Do not permanently delete user records simply because an account is
  deactivated.
- Keep account lifecycle logic separate from authentication credentials.

14. Logout

After logout:
- End the authenticated session
- Protected pages must no longer be accessible
- Browser back-button navigation must not expose protected data
- API requests requiring authentication must fail

15. Session Handling

Use Base44's native session management. Handle:
- Expired sessions
- Invalid sessions
- Logout
- Session restoration
- Protected-route access
- Unauthorized API requests

On expiry, show an appropriate message and redirect to login without
losing unrelated unsaved information where practical. Do not implement
custom authentication tokens unless required by Base44.
The user-facing side: consistent screens, generic error messages
None of this is about security logic. It’s about not accidentally leaking information through the UI itself: a login error that reveals whether an email exists is its own kind of security hole, even with everything else done right:
16. Profile Access

Patient profile: name, email, phone, profile photo, account status,
editable by the patient.

Therapist profile: keep existing fields (name, professional title,
biography, specialties, experience, location, languages, profile photo,
appointment types) intact.

Do not introduce therapist verification yet unless it already exists.

17. Authentication UX

Consistent experience across Login, Forgot Password, Patient Signup, and
Therapist Signup pages, with clear validation messages:
- "Please enter a valid email address"
- "Password does not meet the required requirements"
- "Passwords do not match"
- "Please accept the Terms of Service and Privacy Policy"

18. Security Requirements

- Do not expose passwords, authentication tokens, secrets, or private
  database credentials in frontend code.
- Do not store sensitive authentication information in localStorage
  unless Base44's native implementation explicitly requires it.
- Use HTTPS/secure transport in production.
- Use secure server-side authorization for protected data.

19. Authentication Error Handling

Do not expose sensitive system information (e.g. "No user exists with
this email"). Use generic messages where account enumeration could
occur.

Handle:
- Invalid credentials
- Expired verification
- Password reset failure
- Suspended/deactivated accounts
- Expired sessions
- Unauthorized access
- Server/authentication errors
Testing means trying to reach someone else’s data, not just your own
The first instinct after adding auth is to check that your own login works. This section goes further: existing Stage 1 features have to still work under both roles, and testing explicitly includes trying to manipulate IDs, roles, and URLs, not just clicking through the intended path:
20. Preserve Existing Stage 1 Functionality

Do not break:
- Therapist search
- Filtering
- Profiles
- Availability
- Appointment booking
- Patient appointments
- Therapist dashboard
- Therapist appointment details

After implementing authentication, test the entire existing Stage 1
workflow with both roles.

21. Test With Separate Accounts

Create separate test accounts for at least one patient and one
therapist, using fictional test data only. Test that each account sees
only the functionality appropriate for its role.

22. Required Authentication Test Matrix

Test:
- Patient signup creates a patient account
- Therapist signup creates a therapist account
- Valid patient/therapist login reaches the right dashboard
- Invalid password is rejected
- Forgot password works
- Email verification works
- A patient opening a therapist route is denied
- A therapist opening a patient-only route is denied
- A patient accessing another patient's data is denied
- A therapist accessing another therapist's data is denied
- A patient or therapist modifying their role is rejected
- Logout terminates the session
- An expired session requires re-authentication
- A suspended account is blocked
- An unauthenticated API request is rejected

23. Security Testing

Do not only test the normal UI. Test authorization by attempting to
manipulate:
- URLs
- Record IDs, user IDs, therapist IDs, appointment IDs
- Role values
- API/backend requests
- Form payloads

The system should remain secure even if a user bypasses the frontend UI.
Scope stays locked, and “done” includes the old features still working
The closing sections repeat the same discipline from the opening line: a fixed list of what not to touch, and an acceptance test that only counts as passed if the original Stage 1 workflows still work exactly as before, not just the new auth features in isolation. That acceptance test is the real gate before you deploy AI apps with Base44 to real users:
24. Do Not Build Yet

This task is ONLY for Authentication + User Roles + Authorization. Do
NOT add:
- Clinical records, intake forms, diagnoses, treatment plans, session
  notes, assessments
- Prescriptions, medication management
- Telehealth, payments, insurance
- AI features, messaging
- Advanced admin features
- A therapist verification workflow

Those belong to later stages.

25. Final Acceptance Criteria

Authentication:
- Real patient and therapist signup work
- Login/logout work
- Password reset works
- Email verification works where supported
- Sessions are securely managed

Authorization:
- Every protected route is role-aware
- Backend/database permissions enforce ownership
- Patients cannot access therapist-only functionality and vice versa
- Users cannot modify their own roles or access another user's records
  by manipulating IDs

Existing MVP:
- Patient: Login → Search Therapist → View Profile → Book Appointment →
  View Appointment
- Therapist: Login → Open Dashboard → View Appointment → View Associated
  Patient Information → Update Appointment Status

Do not consider the feature complete until these workflows pass after
the authentication changes.

IMPORTANT IMPLEMENTATION RULE

- Use Base44's native authentication and authorization capabilities
  wherever possible.
- Do not create a custom authentication system unnecessarily.
- Before changing the existing database structure, inspect the current
  application and reuse existing User, Patient, Therapist, and
  Appointment entities where appropriate.
- Avoid duplicating users or creating multiple competing sources of
  truth for identity.
- Make the smallest necessary database/schema changes to support secure
  authentication and role-based access.
- Prioritize security, authorization, data isolation, and reliability
  over visual changes.

After implementation, provide a concise report of:
- What authentication features were implemented
- What role/permission rules were implemented
- What database security rules were added/changed
- What existing Stage 1 functionality was tested
- Any Base44 limitations that prevent a requirement from being fully
  enforced
Step 3: Expect Real Bugs in the Auth Flow
Adding authentication and Base44 role-based access surfaced an edge case the MVP never hit: signing up through Google led to an “access denied” screen, because no role had been selected at account creation.
The fix used the same habit from Part 1: describe the problem to Base44 precisely and let it resolve it. The corrected flow sends a new Google user to a short step to pick Patient or Therapist, rather than an error state. Email verification also worked end to end, with a real verification email arriving after sign-up.
Step 4: Decide Whether to Stay in Base44 or Export
For a healthcare app, this decision comes down to control. Most of HIPAA’s technical safeguards apply where data is stored and processed, in the backend and database, which is exactly the layer you have the least control over on a vendor-managed platform (more in Part 3).
Staying in Base44: a custom domain (Starter plan and above) can be purchased and connected through the platform itself, and the app can go live without touching infrastructure. In the Base44 editor’s left sidebar, that’s under Domains: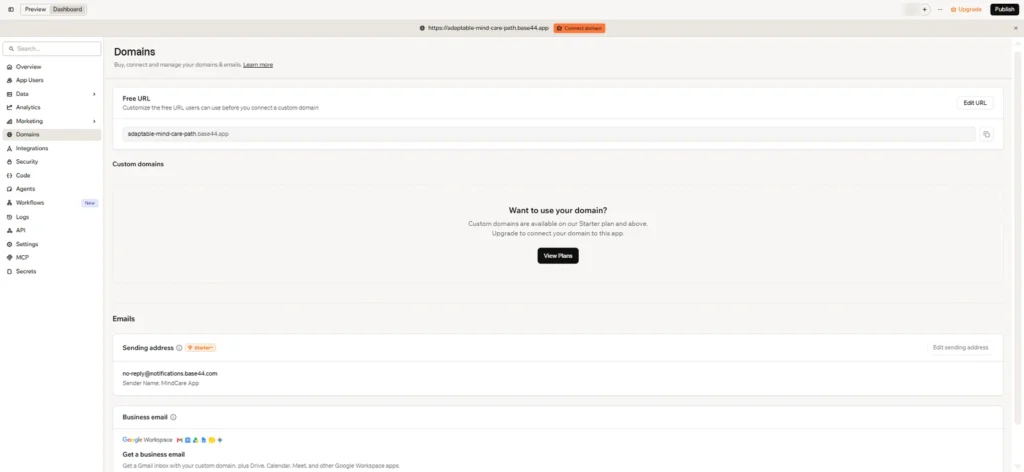
It’s the fastest way to deploy AI apps with Base44, but the backend and database stay outside your control.
Exporting for self-managed production: export requires Base44’s Builder plan or higher. Base44 exports the frontend and any backend functions, but not the authentication system, database, or hosting. In practice, the exported React app still points at Base44’s remote backend URLs, and replacing those URLs with your own services is the Base44 backend replacement that Steps 5 and 6 walk through. If you plan to add HIPAA-oriented logging, it can be done in Base44 before exporting; Part 3 covers that.
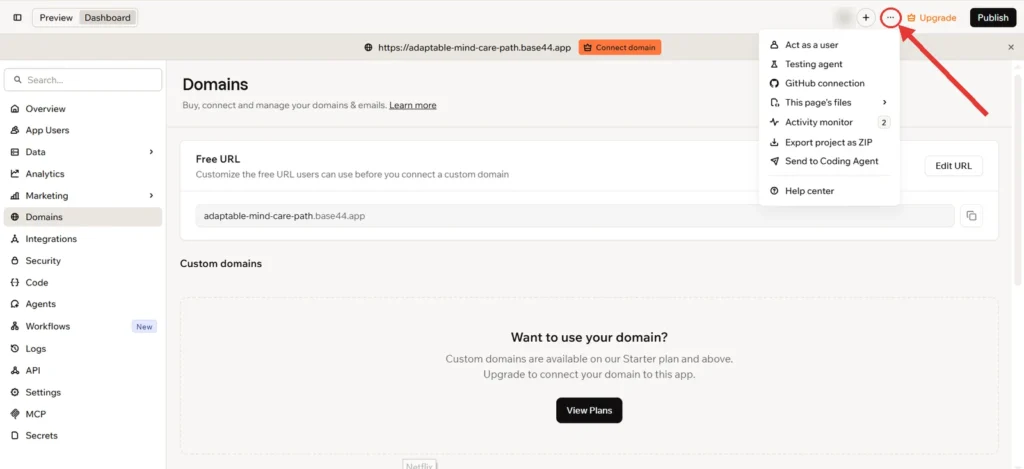
The export lives under the “…” menu in the top-right corner of the editor, not the sidebar. It opens to GitHub connection and Export project as ZIP:
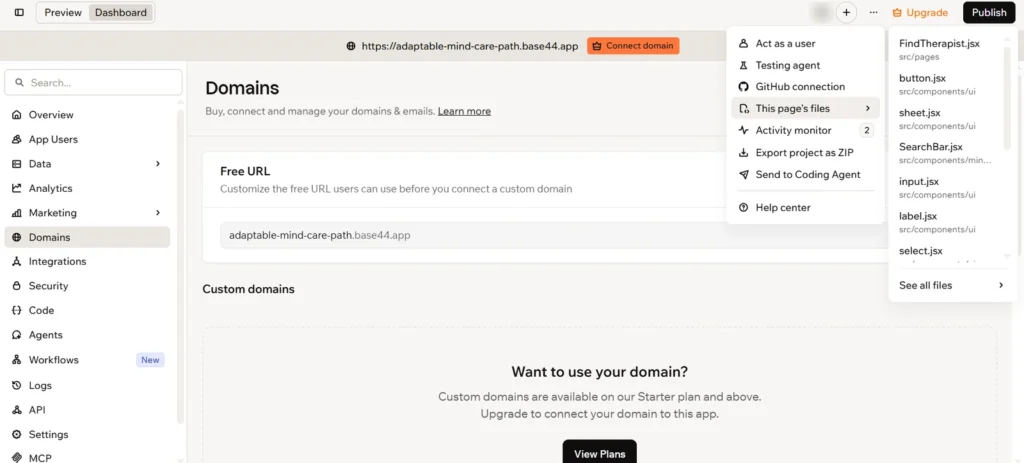
That same menu’s This page’s files option lets you browse the React code behind whichever page you’re on, inside Base44 itself. Each entry shows a file name with its folder underneath: FindTherapist.jsx in src/pages, and UI components like button.jsx, input.jsx, and label.jsx in src/components/ui. These are the same frontend files the export gives you:
Weighing whether to stay on Base44 or rebuild the backend? Technology Rivers helps healthcare teams plan the move from an AI-built prototype to infrastructure they control. Talk to us about your migration path
Step 5: Generate the Backend
When you export to deploy AI apps with Base44 outside its hosting, this is the step that does the heaviest lifting. Once you’ve exported the frontend, it still depends on Base44’s authentication and database, which don’t come with it. The new backend gets built outside Base44 entirely, in an AI coding assistant like Codex, Claude Code, or Cursor.
The prompt started the same way as in Step 2, with a short, plain request to ChatGPT describing the situation:
I have created a Base44 app and downloaded its code for local use and
custom production deployment. However, I only received the UI/frontend
code, while its APIs are hosted on Base44 and cannot be altered locally.
Now I want to create the backend along with the database configuration
using Codex or Claude Code. Give me a detailed prompt that can help
build the complete working app according to the existing frontend.
The prompt matters as much here as it did inside Base44. Asking a coding assistant to simply “build a backend for MindCare” risks APIs that don’t match the frontend. The prompt below treats the exported frontend as the source of truth instead. These are its key sections.
Inspect the frontend before writing any backend code
The first instruction is to read the whole repository and find every place the frontend talks to Base44, before a single endpoint exists:
Build the Complete Production Backend for the Existing MindCare Frontend

ROLE
You are a senior full-stack architect and backend engineer.

The downloaded repository currently contains primarily the frontend/UI
code, while the original application depended on Base44-hosted
APIs/backend services. The existing frontend is the source of truth for
the current UI and user experience.

1. CRITICAL RULE: INSPECT BEFORE IMPLEMENTING

Before writing backend code, thoroughly inspect the existing repository.
Do NOT immediately start creating a new backend based on assumptions.

First analyze:
- Directory structure, package manager, package.json, framework
- React components, routes, pages, hooks, context providers
- Services, API clients, fetch/axios calls
- Base44 SDK usage and any references to Base44-specific services
- Authentication implementation and environment variables
- Forms, validation, state management
- Appointment, therapist, patient, and availability logic
- Any mock/demo or hard-coded data

Also inspect all frontend forms and actions to determine exactly what
data the backend must accept and return.
Keep the existing frontend exactly as it is
The exported UI is the product. The backend gets built to fit it, not the other way around:
3. DO NOT BREAK THE EXISTING FRONTEND

The existing frontend already represents the intended Stage 1 product.

Preserve:
- Existing pages, navigation, and visual design
- Existing forms
- Existing therapist search and therapist profiles
- Existing availability UI and booking flow
- Existing patient appointments
- Existing therapist dashboard and appointment details

The goal is:
Existing frontend + new backend = working application

Do not redesign the product unless a change is technically necessary. If
a frontend change is required, make the smallest possible change.
Name the stack, but let the repository overrule it
The prompt recommends a stack for the new backend and leaves room for the codebase’s own conventions:
4. RECOMMENDED BACKEND STACK

Unless the repository or deployment requirements strongly indicate
otherwise, use:
- Backend: Node.js + TypeScript
- Framework: Fastify, or another mature REST framework if the repository
  already has a strong convention
- Database: PostgreSQL
- ORM: Prisma
- API: REST, base URL /api/v1
- Validation: Zod
- Password hashing: Argon2id, if implementing password-based
  authentication ourselves
- Testing: unit, integration, and API tests
- Local infrastructure: Docker Compose
Block double-booking at the database, not the button
Two patients clicking the same slot at the same moment is a real scenario, so booking has to be transactional:
13. DOUBLE-BOOKING PROTECTION

Appointment booking must be concurrency-safe. If Patient A and Patient B
both see 3:00 PM as available and click Book simultaneously, only one
booking may succeed.

Implement transactional booking logic. The operation should:
- Start a transaction
- Lock/check the availability slot
- Verify it is still available
- Create the appointment
- Mark/reserve the availability
- Commit the transaction

If the slot is already booked, return 409 Conflict with a user-safe
message:
"This appointment slot is no longer available."
Check ownership on every request
The rule from Step 2 carries over to the new backend: the server decides who can see what, not the frontend.
24. SERVER-SIDE AUTHORIZATION

This is mandatory. Do not rely on frontend route protection.

Every protected endpoint must verify:
- Authentication
- Account status
- Role
- Resource ownership/relationship
- Action permission

GET /appointments/123 must not simply query appointment.id = 123. It
must additionally verify that the authenticated user is authorized to
access that appointment.

25. PATIENT DATA ISOLATION

Patient A must never be able to access Patient B's appointment by
changing appointment_id or any URL/query/body parameter. Therapist A
must not be able to access Therapist B's patients simply by changing
therapist_id.

Implement authorization in the service/repository layer.
Finish with zero runtime calls to Base44
The point of the migration is independence, so the prompt defines “done” as the app working with Base44 switched off:
35. DO NOT USE BASE44 AS THE BACKEND

The purpose of this migration is to remove the application's runtime
dependency on Base44 APIs.
- Find every Base44 API dependency in the frontend.
- Replace it with the corresponding local backend API.
- The final application should work when Base44 is completely
  unavailable.
- There should be no required runtime request to Base44.

After migration, verify this by searching the entire codebase for Base44
references.
The result is a local API server the exported frontend points at through its environment variables, tested against the same core flows from Part 1: search, book, and view the dashboard.
Step 6: Recreate the Database Structure
Base44 exports individual table schemas and table data, but not a full database dump or its configuration. The other half of the Base44 backend replacement is recreating the database from those exports. Here’s what the data view looks like inside Base44, with the Patient table open:
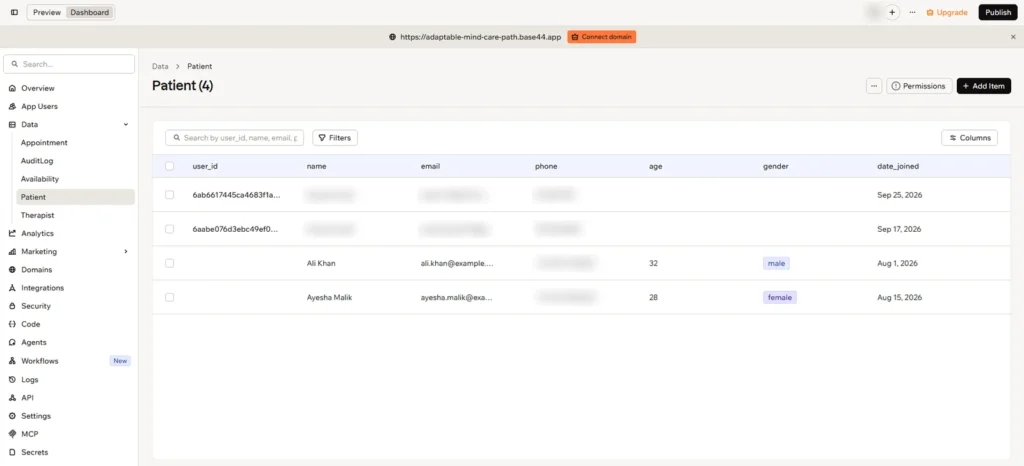
Open each table (Patient, Therapist, Appointment, and Availability, plus AuditLog if you’ve already added audit logging, covered in Part 3) from the Data section in the sidebar and export its schema and data. User accounts live under App Users, which is part of Base44’s authentication system, so the new backend rebuilds those itself. The backend prompt from Step 5 then turns those entity definitions into a PostgreSQL schema with Prisma migrations and seed data. The prompt spells out what a clean setup has to look like:
33. DATABASE MIGRATIONS

Use Prisma migrations. The repository should contain:
- prisma/schema.prisma
- prisma/migrations/
- prisma/seed.ts

The database must be reproducible from a clean installation. A new
developer should be able to:
- Start PostgreSQL
- Install dependencies
- Run migrations
- Run seed
- Start backend
- Start frontend
- Use the application
Once the frontend, backend, and database are connected, the whole system should run locally with no calls to Base44, which is the last checkpoint before deployment.
Step 7: Deploy AI Apps with Base44 on Your Own Infrastructure
With the frontend, backend, and database running together outside Base44, the next step is containers. The backend prompt covers the backend image and local setup:
48. DOCKER

Create a production-capable backend Dockerfile.

Also create a local docker-compose.yml with PostgreSQL. The development
environment should allow:

docker compose up

to start required infrastructure. Document how to run migrations.
Build Docker images for both the frontend and the backend so the whole system runs in isolated containers. The frontend image keeps local and staging setups consistent; in production, the built frontend is usually served as static files. From there, here’s a standard self-managed AWS shape for Base44 production deployment:
- Push the images to a container registry (AWS ECR)
- Run the backend container on a managed compute service (ECS) behind a load balancer (ALB)
- Serve the built frontend as static files from S3, with CloudFront in front of it
- Run the database on a managed service (RDS)
- Point your custom domain at CloudFront for the app, and an API subdomain at the load balancer
A simpler, older alternative to containers is running the backend directly on a single EC2 instance. It works, but it’s generally less resilient than the container-based approach. The cloud provider itself (AWS, Azure, Google Cloud) is a business decision independent of this cloud architecture; the shape above applies across providers.
Continue the Series
In Part 3, the focus shifts from production readiness to compliance and security hardening: encryption, audit logging, and the infrastructure protections needed to move MindCare closer to HIPAA readiness. None of the steps above make MindCare HIPAA compliant on their own. Before compliance work starts, anyone planning to deploy AI apps with Base44 needs real authentication, enforced roles, and a clear path to infrastructure they control, which is what this post covered.
Ready to move your Base44 app from prototype to production? Request a consultation to discuss architecture, infrastructure, and deployment strategy.