Blogs » Build a Rule-based Chatbot Using IBM Watson Assistant
Table of Contents
In today’s day and age of digital transformation, customer experience takes the centre stage when it comes to having an edge over your business competitors. We at Technology Rivers firmly believe in and strongly uphold this notion that customer experience is essential for building a successful company. Different CRMs and ERPs offer varied tools in order to enable companies to create a seamless user experience for their customers.
In order to achieve that, companies make sure that customer-facing interfaces and outlets are equipped with top-notch responsiveness and support. As more customers engage on digital channels, companies are increasingly investing in implementing virtual assistants and chatbots for handling customer requests on websites, mobile applications, consumer messaging apps, and social networking platforms.
Gartner research suggested that by 2020, 25 percent of customer service and support operations will be managed by a virtual assistant or a chatbot across conversational interfaces. According to their reports, organizations experienced a reduction of up to 70 percent in call, chat, and/or email inquiries after implementing a chatbot. They also reported increased customer satisfaction. This further reinforces the notion that organizations that are en route to digital transformation would never want to miss out on this opportunity to introduce virtual assistants and chatbots into their interfaces for expediting their revenue growth while minimizing the costs.
In some of our previous blogs in the chatbot tutorial series, we have demonstrated how building custom chatbots through some state-of-the-art development platforms like Google Dialogflow and Rasa can cater to different types of conversational AI design needs for small to large scale enterprises. One such platform is also provisioned by IBM called Watson, which we are going to cover in this blog.
A Brief History of IBM Watson

Source: IBM Watson Progress and 2013 Roadmap
Now IBM’s industry-leading portfolio of AI or artificial intelligence solutions, Watson started off as a question-answering computer system capable of answering questions posed in natural language, developed in IBM’s DeepQA project by a research team led by their principal investigator David Ferrucci. Watson was named after IBM’s founder and first CEO, industrialist Thomas J. Watson.
Named after IBM’s founder and first CEO, Watson was initially build to answer questions on the famous quiz show Jeopardy!. In 2011, Watson competed on Jeopardy! against world champions Brad Rutter and Ken Jennings, snatching away the first place prize from its human competitors. At the same time, it opened new doors in AI for making businesses smarter and reducing the costs and hurdles associated with AI adoption.

Ken Jennings, Watson, and Brad Rutter in their Jeopardy! exhibition match
IBM Watson for Building Virtual Assistants
IBM Watson Assistant is a rule-based chatbot that provides a dialog interaction between the conversation system and users. Using artificial intelligence and natural language processing (NLP), IBM Watson Assistant enables companies to provide quick information across any channel at the scale they and their customers need. By learning from customer conversations, Watson Assistant automatically improves its ability to resolve issues the first time.
Watson Assistant uses natural language understanding (NLU) to understand colloquial speech patterns and surfaces dynamic rich media — video, image, audio — to automate the customer experience while engaging your customers.
Below is a graphical overview of IBM Watson Assistant’s architecture:
Source: IBM Watson
Why use Watson Assistant?
From a business’s standpoint, using IBM Watson Assistant for building a chatbot can be conducive if the following factors are of critical importance to you:
Scalability with Security
Watson Assistant affirms that it can handle thousands of concurrent phone calls to support even the most demanding call center environments. Given our own experience at Technology Rivers with developing VoIP features like a 3-way call and round-robin call forwarding for Ripcord.io using IBM Watson, we can testify about this ability first hand.
Additionally, Watson Assistant lets you protect and safeguard your customer conversations and data with IBM security, scalability, and flexibility.
Multi-channel Integrations
Watson Assistant is designed to extend and enhance your current customer service applications and resources, by enabling your chatbot to:
- Respond to customer inquiries via phone and digital channels
- Find answers within any existing structured or unstructured content
- Trigger actions and interact with additional systems
Watson provides the opportunity to embed your assistant as a basic webchat interface or a voice agent that can respond to customer calls in real time. Additionally, it allows you to readily integrate your chatbot with a number of channels like custom web and mobile apps, WhatsApp, Facebook, among so many others.
Quick and Easy Development
Watson Assistant enables you to build a conversational AI interface without a degree in programming or computing. Using a drag-and-drop interface for dialogue management, you can customize your chatbot to fit your brand and embed it in your website and applications with a simple link, which we will show you later on in this blog.
This was a brief overview of IBM Watson Assistant. Now that we have learned a bit about Watson Assistant and how it works, let’s dive right in to build our own custom chatbot using it.
How to Build a Custom Watson Assistant?
Now let’s start to build a custom Watson Assistant. For that, we will first list down what we want our rule-based chatbot to do for us.
Problem Statement
For our tutorial, let’s take the following case in point: An IT support director in a university wants to revolutionize the way that the team supports the internal staff and increase the productivity for the whole team.
In this blog, we will show you how you can build a simple IT support help-me chatbot that streamlines IT support queries by automating the virtual assistant’s dialog flow.
Prerequisites
In order to complete this tutorial, you will need to fulfill the following:
- You must have an IBM Cloud account. The account is free and provides access to everything you need to develop, track, plan, and deploy apps. You can sign up for a trial.
- Your IBM Cloud account must have at least 8 GB of runtime and container memory, plus access to provision of up to 10 services.
- You need a clone of this GitHub repository, as you might need some of the files to expedite your work.
- To develop on the broker code or to run locally or on IBM Cloud, you must be familiar with Node.js, Express.js, and Angular 2.
Create the Watson Assistant Service
The first task is to create an instance of Watson Assistant on IBM Cloud. Let’s look into the steps for doing that.
1. Once you are logged in to your IBM Cloud account, click Catalog and then click Services > Watson > Assistant.
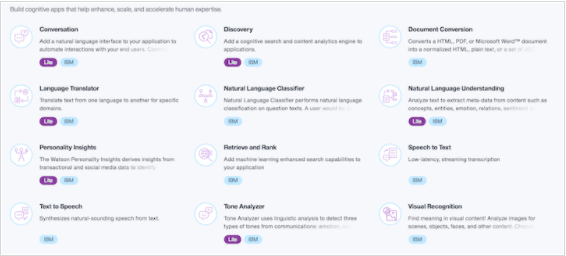
2. For the service name, type IT-support-conv. Click Create and it will take you to a page as shown below. Click Launch tool.
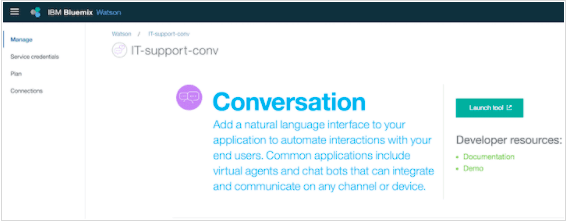
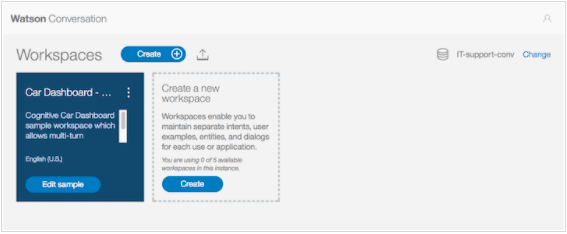
3. This will open the Watson Assistant workspace. The Car Dashboard sample is a predefined conversation. You can use it to get a few implementation examples.
Create a Workspace
You must use workspaces to maintain separate intents, user examples, entities, and dialog flows for each application. Watson Assistant uses a step-by-step approach to guide you to create workspace, intents, and so forth.
- In the Workspaces section shown above, click Create.
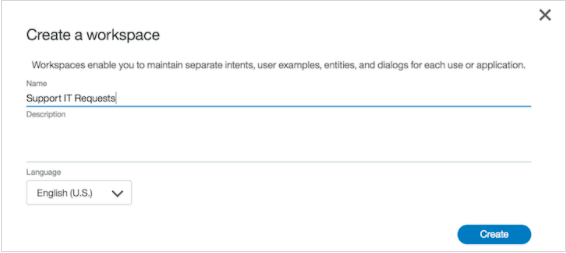
- Type a name for the workspace as Support IT Requests, or any other name of your choice. Click Create.
Create and Add Intents
An intent shows a user’s intention behind asking a couple of questions to the virtual assistant to achieve a specific objective.
To identify what intents the virtual assistant would have to handle, you can start with something basic that a user might want and then list down the many different ways a user can ask for it—those are the examples. Examples can be developed by using a crowdsourcing approach as well.
For our particular example, you might want to gather a list of standard questions that the IT support team receives from their users:
- How can I reset my password?
- How can I bring my own device and connect to the enterprise network?
- When is the renewal due for my workstation?
- How to get access to business application AbC?
- I cannot log into my account.
- I do not remember my login credentials.
- Can you reset my ID?
Based on the above-mentioned questions, you can extract these corresponding intents:
- Reset password
- Connect to enterprise network
- Workstation renewal
- Application access
- Account retrieval
1. Add those intents to the workspace: From the Build page, click Intents and click Create new.
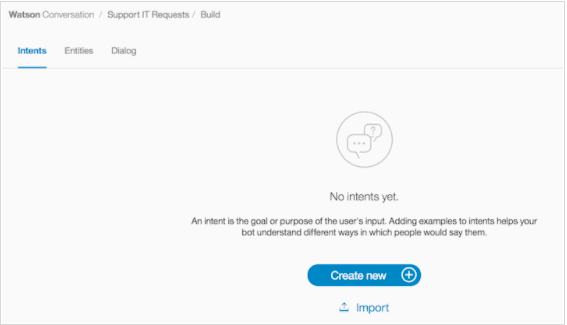
2. For the intent name, type ApplicationAccess after the number sign (#).
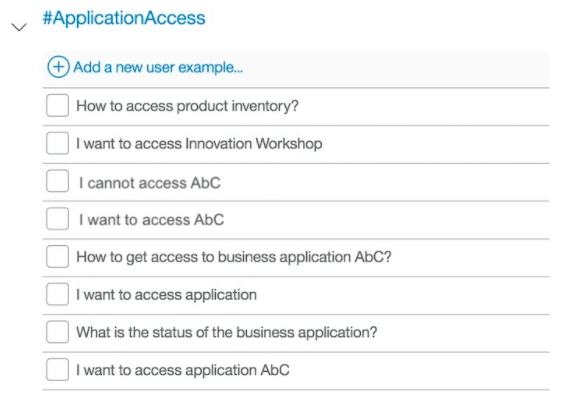
3. For each intent, add examples to train the conversation for intent recognition. You can enter the same examples as shown in the previous image.
4. Create the #Goodbye intent and add some examples for it.
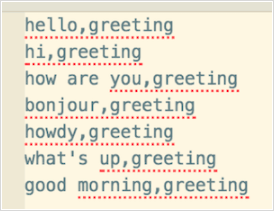
5. Because many intents can be reused from conversation to conversation implementations, you can define .csv files and import them in the Conversation Tool Intents. The .csv format is shown here with one intent per line:

6. To get the IT support demo intents, click the Import link on the Intents page to import the wcs-workspace/ITSupport-Intents.csv file from the GitHub repository mentioned earlier.
Test the Intents
Now you should test your chatbot with the created intents.
1. As soon as you create an intent, you can test it by clicking Ask Watson icon in the top, right-hand side of the conversation editor.

2. Enter one of the examples. You should get the #Greetings intent identified by Watson.
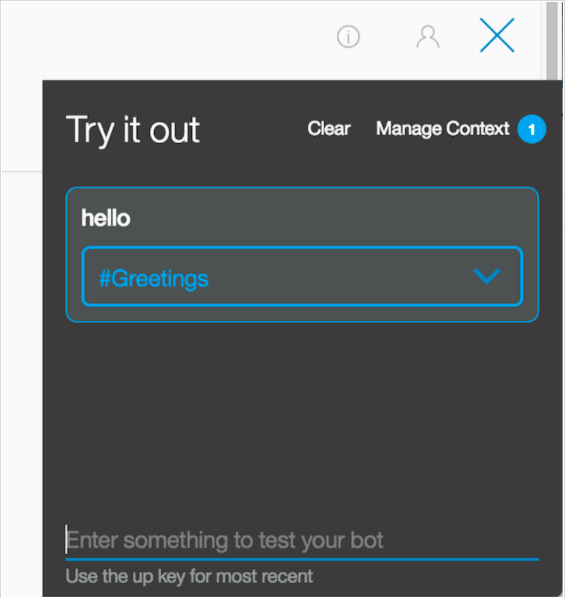
Enter other greetings to test the #Greetings intent.Test a few of the other intents that you imported from the .csv file to verify that the chatbot is able to recognize the right intent against an expression.
Add Entities
Next, we will add entities. An entity is a portion of the user’s input that you can use to provide a different response to a particular intent. Adding values and synonyms to entities helps your chatbot learn important details that your users might mention. Each entity definition includes a set of specific entity values that can be used to trigger different responses. Each value can have multiple synonyms that define different ways that the same value can be specified in user input.
1. Click Entities. On the Entities page, click Create new.
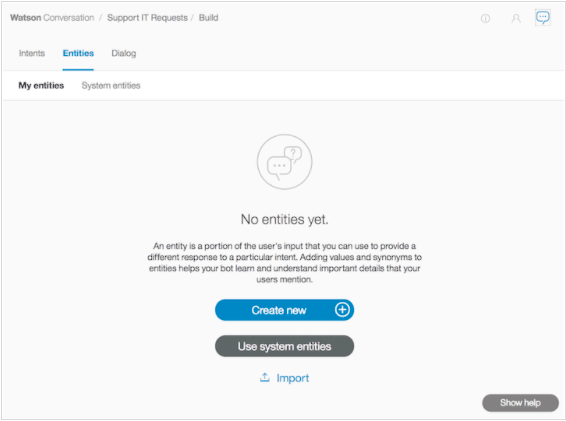
2. Create entities to represent to the application what the user wants to access.
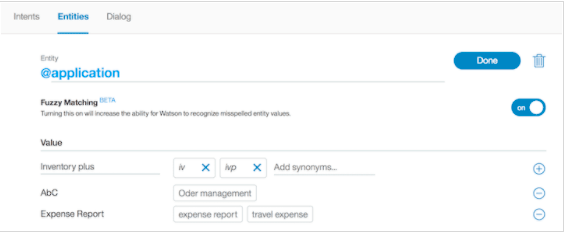
Fuzzy logic is a feature that allows Watson Assistant to accept misspelled words. You can enable this feature at the entity level, as shown in the image above.
As you did for intents, you can reuse entities’ definitions through the export and import capabilities. Import the wcs-workspace/ITSupport-Entities.csv file from the same Git repo.
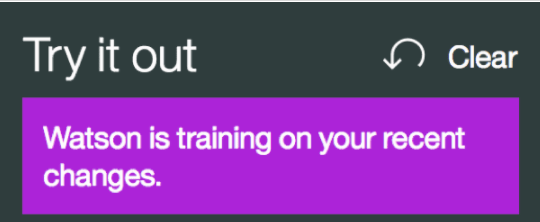
3. If you click the Ask Watson icon immediately after you import the entities, the Watson is training message is displayed. Watson Assistant classifies the entities.
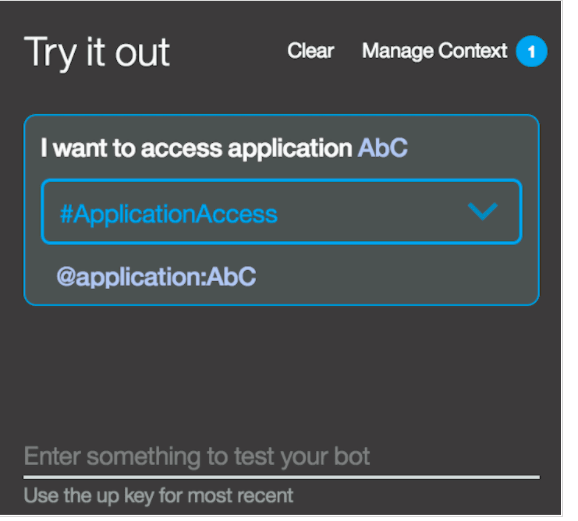
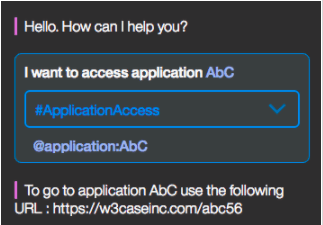
4. You can unit-test the entities by entering I want to access application AbC. The following image shows both the intent and entity (@application:AbC) extracted by Watson Assistant:
Build the Dialog
After you specify your intents and entities, you can build the dialog flow.
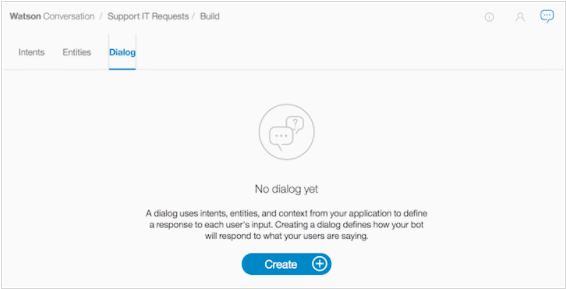
A dialog is made up of nodes that define steps in the conversation.
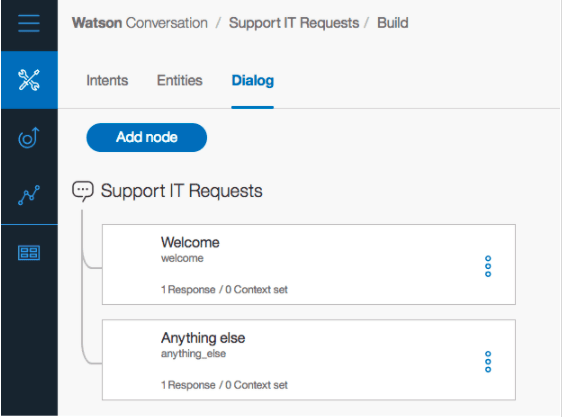
In the previous image, two dialog nodes are shown. The first node is the standard welcome message. The other node is a catch-all node named “Anything else.” Dialog nodes are chained in a tree structure to create an interactive conversation with the user. The evaluation starts at the top, so the welcome node is assessed before the “Anything else” node.
If you click the welcome node, the standard Watson response is “Hello. How can I help you?” To validate how the flow works, you can click the Ask Watson icon.
Define the greetings node
1. The first node addresses greetings in a response to a query such as “hello.” Click the welcome node and click Add node below:
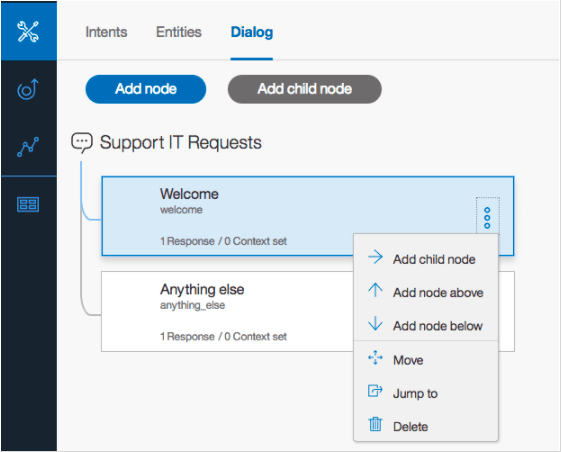
A new node is added between the welcome and “Anything else” nodes.
At each node level, you can expand the conversation by adding nodes. If you add nodes at the same level, the flows are parallel. Adding a child node creates a dependent track of conversation, and the conversation branches out into a tree structure.
2. Name the new node Handle Greetings. In the If bot recognizes field, change the value to #Greetings. The number sign (#) represents a prefix for intent. The condition is triggered when the Watson natural language classifier classifies the query as a greeting intent.
3. Add these responses under Then respond with:
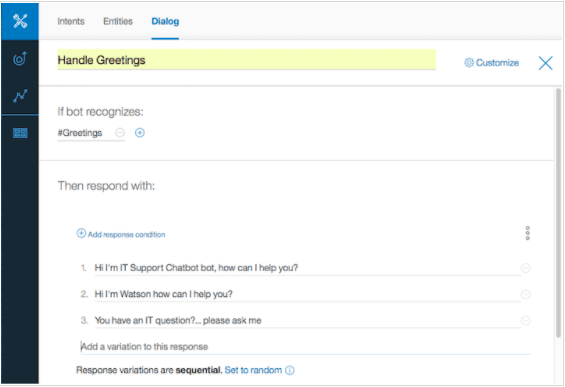
The previous image also illustrates how to use the multiple responses pattern to avoid being repetitive. The chatbot can present different answers to the same query. You can allow the system to randomly select an answer from the list of potential responses.
4. Unit-test your dialog by clicking the Ask Watson icon:
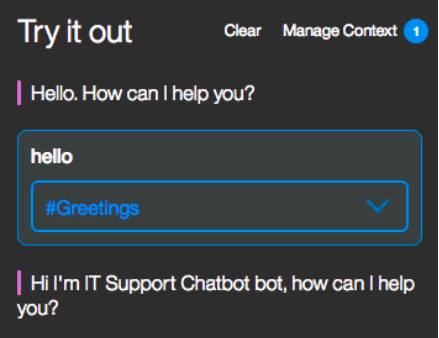
At the beginning of each conversation, the evaluation starts at the top level of dialog nodes.
Manage the “Anything else” Node
The bottom node is used when none of the defined intents are matched, just like how the Fallback Intent in Google Dialogflow works. It can provide a default message, as shown in the following image:
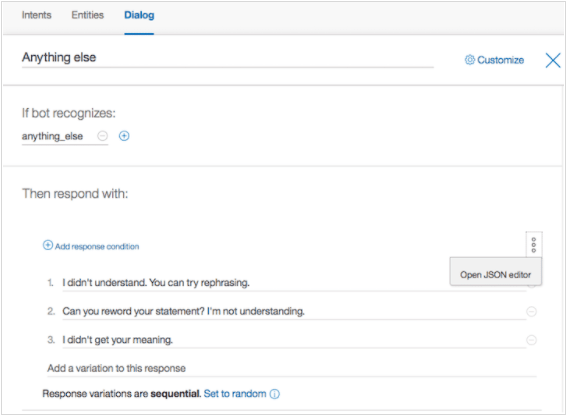
From the menu on the right side of the response area, you can open the JSON editor and assess the data that is returned as part of the interaction. The JSON document includes an output JSON object with text with different values. To the output, add an attribute, name it Missing case, and set it to true. When you persist the conversation flow into a document-oriented database, you can search the queries that were not addressed by the dialog nodes so that you can add more cases later, if needed.
Define the Application Access Node
Now you can create a dialog branch to handle the #ApplicationAccess intent.
1. Click the “Handle Greetings” node and then click Add node. Name the new node Handle application access. In the If bot recognizes field, type #ApplicationAccess.
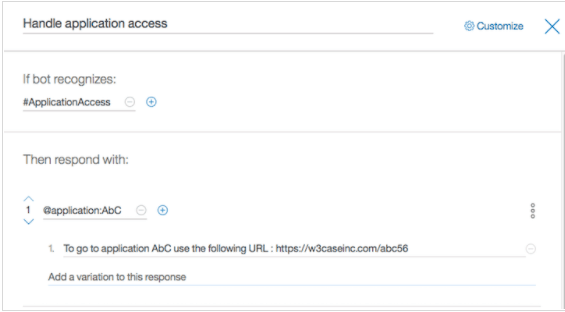
When users enter queries about application access, they will most likely specify one of the supported applications; for example, I want to access application abc. Therefore, in the Application Access node, you need to add multiple conditions by looking at the different possible entities. As illustrated in the previous image, the first condition tests on the presence of the @application:AbC entity. When it matches, the response returns a static URL. Later in this later you will learn how to make the URL clickable from Watson Assistant in the chatbot application.
2. To add more conditions in the same node, click Add another response.

3. In the condition, click @application:ExpenseReport and provide the solution to access the app. Repeat these steps for all the entities that you defined for the application.
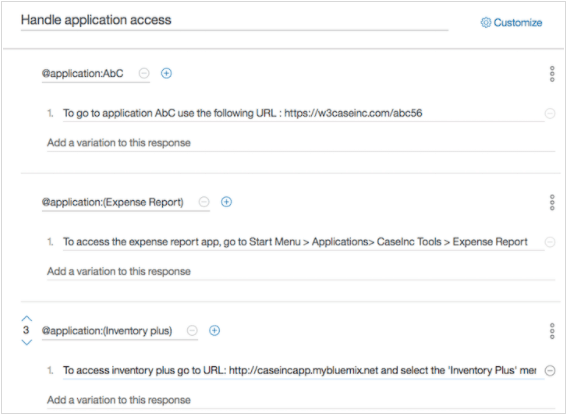
4. Test the sentence I want to access application AbC. You should get the #ApplicationAccess intent and the application AbC entity. Verify that the node match gives the expected response:
5. If the user does not specify any application, you want to ask which one to access from a list of predefined apps. This is another response pattern where predefined content can be selected by the user. Add a node as shown in the following image:

6. If you enter a sentence like Access application, the expected response is proposed.
7. If you enter a choice like Inventory Plus, you might not get the expected result because the classifier might have extracted the wrong intent. From the unit test, you can enforce Watson Assistant to do a better job by selecting the right answer: select the #ApplicationAccess intent and Watson will retrain it. Be sure to test again to ensure that the conversation works as expected.
8. Try a few statements that aren’t the same as your training data.
Adding any new entity or intent makes Watson Assistant retrain its classifier.
The evaluation round works in two stages. In the first stage, the dialog tries to find an answer in the child nodes of the contextual node. That is, the dialog tries to match all the conditions of the child nodes of the contextual node. If the final child node has a condition of “true,” meaning that it is to be used if none of its siblings are matched, that node’s response is processed.
If no match is found, the dialog continues to a second stage where it tries to find an answer to input by matching the top level of dialog nodes.
The top-level of dialog nodes should contain anything_else node as the last node, which is reached when no match occurs in the conditions of the top-level nodes. Typically, if an Anything_else node is defined, the dialog returns an answer to every user input.
At this stage, you can build a static flow. In the next step, you will get user input and will have to do something with it.
Advanced Dialog Work
Now, we will show how you can programmatically make your chatbot more advanced in its functionalities.
In Watson Assistant, there is an established notion that each time the dialog returns a response and waits for user input, the dialog stores the ID of the node where the conversation must resume. This node is called the contextual node. Its ID is added to the context.system.dialog_stack property, which contains a JSON array of dialog node IDs that are on the dialog stack.
The context object
State information for your conversation is maintained by using the context object. A context object is a JSON object that is passed between your application and the Watson Assistant service.
This example shows context that is returned from an interaction that reaches a top node:
json
{
"context": {
"conversation_id": "Conversation-ut",
"system": {
"dialog_stack": [
{
"dialog_node": "root"
}
],
"dialog_turn_counter": 1,
"dialog_request_counter": 1,
"_node_output_map": {
"AbC access": [0]
},
"dialog_in_progress": false
}
}
}
Add variables to context
Suppose that you want to return an actionable URL, meaning that the response includes a URL variable that the user can click to go to a new page. To try this scenario, you present the URL of a business process that is deployed on IBM BPM on the Cloud.
1. If you didn’t import the intents definition from the lab CSV file, add an intent called the #supplieronboarding to support the user’s query about accessing the supplier onboarding business process.
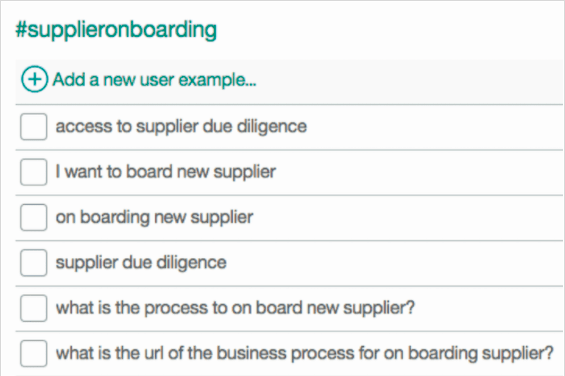
2. Add a node to the dialog flow under the “Application access” node. Name the node Handling supplier onboarding and for its intent, type #supplieronboarding.
In the response, access the Advanced editor to edit the JSON response object:
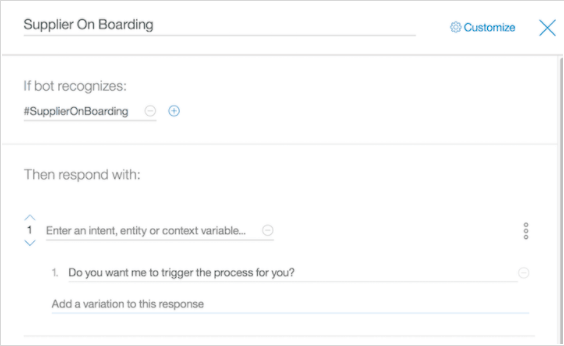
The response object includes an output object with the text to present and a context object. The context object has a new url variable to give IBM BPM on Cloud access and an action variable to control the behavior of the broker code. When the user enters a question like “I want to access the supplier on boarding business process,” the returned object looks like this example:
json
{"intents": [
{
"intent": "supplieronboarding",
"confidence": 0.940047025680542
}
],
"entities": [
{
"entity": "supplier",
"value": "supplier"
}
],
"input": {
"text": " I want to access the supplier on boarding business process"
},
"output": {
"log_messages": [],
"text": [
"To access the Supplier On Boarding business process use the url: "
],
"nodes_visited": [
"Supplier On Boarding",
"Provide URL for Supplier on boarding"
]
},
"context": {
"conversation_id": "Conversation-ut",
"system": {
"dialog_stack": [
{
"dialog_node": "root"
}
],
"dialog_turn_counter": 1,
"dialog_request_counter": 1
},
"url": "https://vhost001.bpm.ibmcloud.com/bpm/dev/ProcessPortal/dashboards/SYSRP/RESPONSIVE_WORK",
"action":"click"
}
}
The code that calls the Watson Assistant API can take the URL value and create a hyperlink in HTML so that the display has an actionable link:
javascript
if (rep.context.url != undefined) {
if (rep.context.action === "click") {
rep.text=rep.output.text[0] + "Here"
}
}
The actionable link is shown in the last interaction, with the clickable button added to the message:
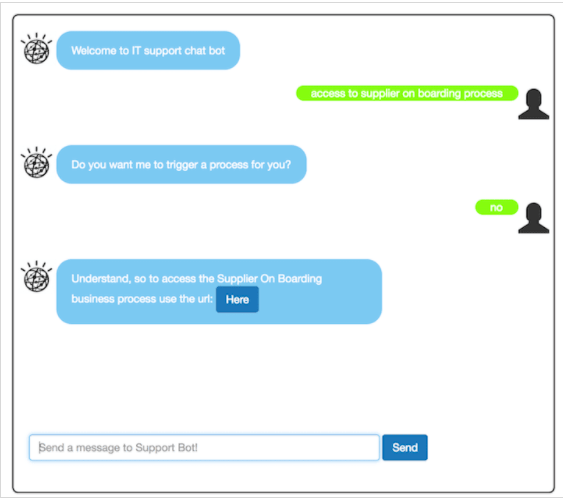
Much can be done on the context object. For example, the application code can add elements in the context object before it calls the Watson Assistant service. Then, at the condition level in a node, tests can be done on those elements.
To use a context variable in your condition, use one of these formats:
- $variable_name:value
- $variable_name == ‘value’.
The value of the condition might have been set by the application or in the response portion of a previous dialog node. In the next test, the canAccessSOD context variable is a Boolean that is set by accessing an internal authorization service that, for example, returns true if a user ID can access an application.
Use slots
Add a dialog flow to address when a user wants to bring their own device. For our use case, we assume that only certain brands and devices are supported, so you must determine the brand and device type. The goal is illustrated by the dialog shown below:
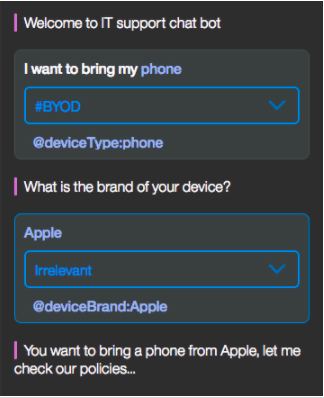
From the first query, “I want to bring my phone,” Watson Assistant can get the #BYOD intent and the @deviceType:phone entity. The dialog flow asks for the brand of the device. If the device type is not extracted, it asks a question about the type of device that the user wants to bring.
One way to support this combination is to add a hierarchy of nodes and code the conditions on entity.
1. If you didn’t import the intent and entities, create an entity for the “bring your own device” question.
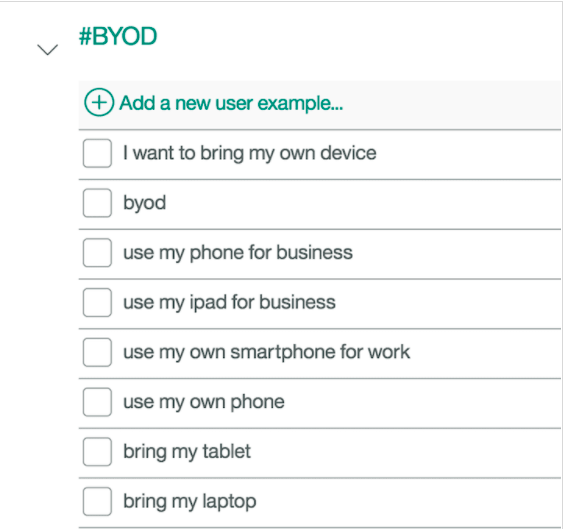
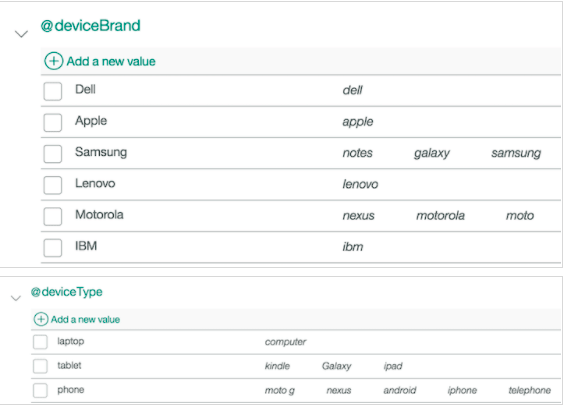
2. Create the @deviceBrand and @deviceType entities, as shown below:
3. Add a flow by adding a top-level node that uses the #BYOD intent as the “recognize” condition. Click the Customize menu to enable slots for this node.
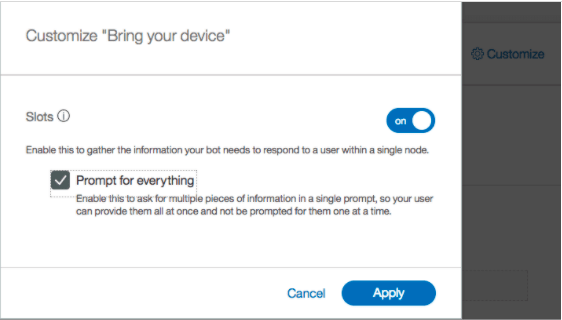
Verify that the condition changes to “Then check for.”
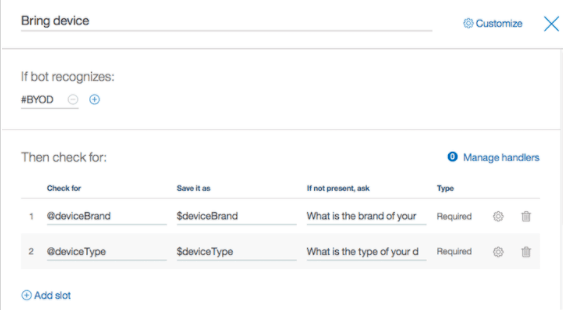
4. Add the following two slots:
- Check for the @deviceBrand entity and save the result in the $deviceBrand context variable. If the brand is not present, ask “What is the brand of your device?”
- Check for the @deviceType entity and save the result in the $deviceType context variable. If the type is not present, ask “What is the type of your device (tablet, smartphone, computer)?”
5. Slots make it possible for the service to answer follow-up questions without reestablishing the user’s goal.
6. For the response, use the advanced dialog to enter output text to display the content of the device type and brand:
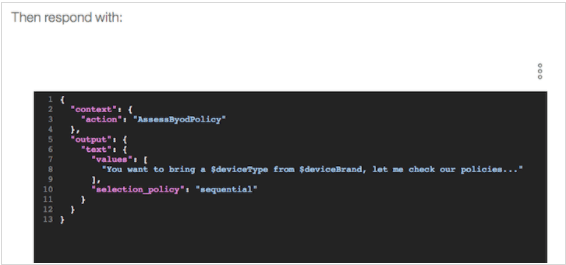
In the And then action section, be sure to set wait for user input.
Use interaction to get parameters to call a web service
In the context of a dialog flow, the set of interactions aim to gather input parameters so that after the interaction is done, the broker code can call a web service and pass the parameters as part of the payload.
In this step, the IBM BPM supplier onboarding process is initiated through a SOAP call. There are two input parameters for it: the company name, the product name. The client code is in the conversation broker code as a feature in the server/routes/features/supplier-bpm-client.js file. Because the focus is on the dialog, you must modify the previous flow to handle the “Supplier process” intent. The first node asks whether the user wants the chatbot to trigger the process.
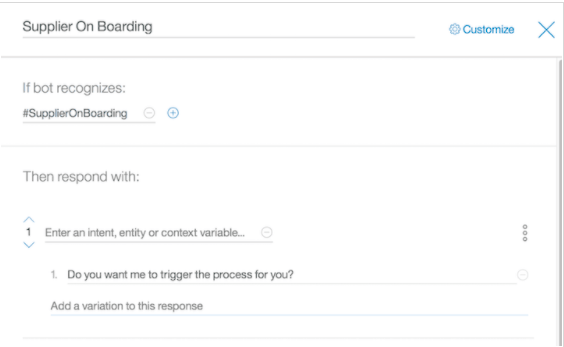
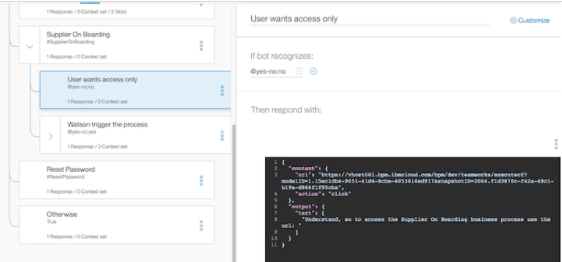
When the response is no, you use the previous behavior by providing the URL to the IBM BPM Process portal so that the user can manually start the process.
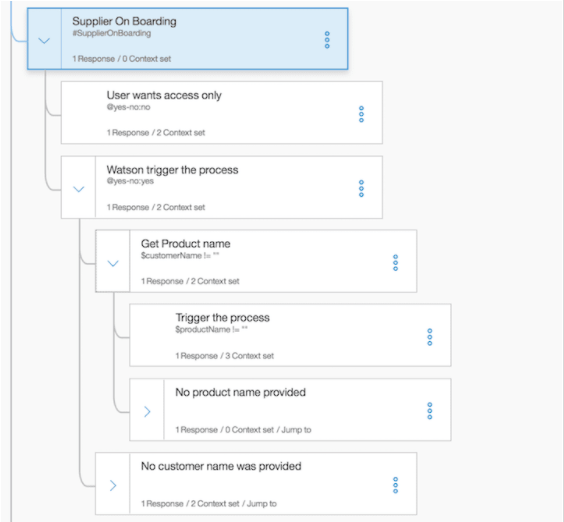
When the response is yes, the two next interactions are used to get the company name and product name. You can try to reproduce this structure:
Outside of the output.text file, which provides a question about the company, the context uses two variables to drive the broker code. The action is set to getVar and the varname is set to the name of the variable to add to the context via code. On a yes response, the chatbot asks about the supplier company name.
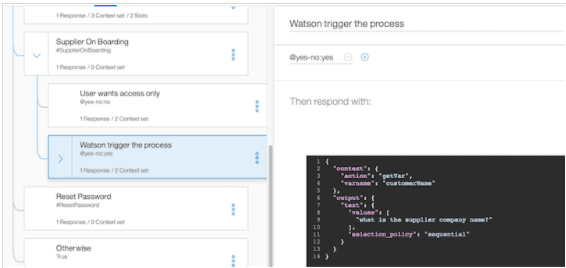
The broker code dynamically adds the specified variable in the context to keep the data for the next interaction. The following code is in the function to manage the user’s response before it calls the Watson Assistant service:
javascript
if (req.body.context.action === "getVar") {
      req.body.context[req.body.context.varname] = req.body.text;
  }
The same approach is done for the product name:
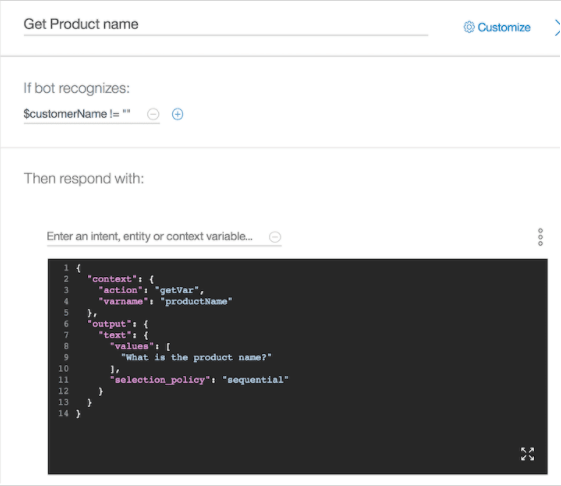
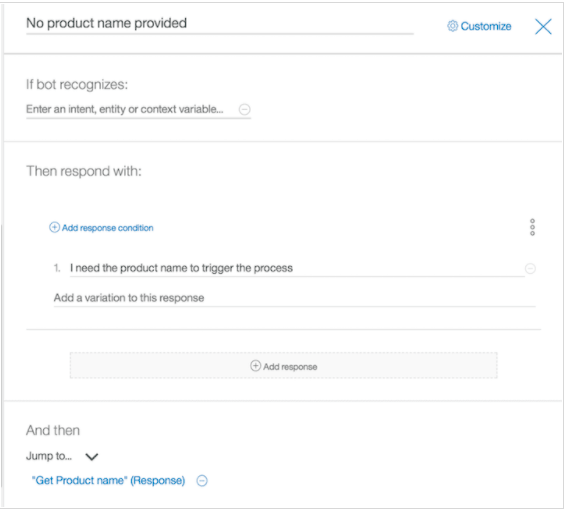
During the dialog execution, if the user doesn’t specify the product or company name, a node in the dialog flow identifies the missing parameters. The node then routes the flow back to the node, asking for the missing parameters. As you can see in the next image, the “Jump to…” constraint is added to the node definition so that the dialog flow returns to the “Get Product name” node.
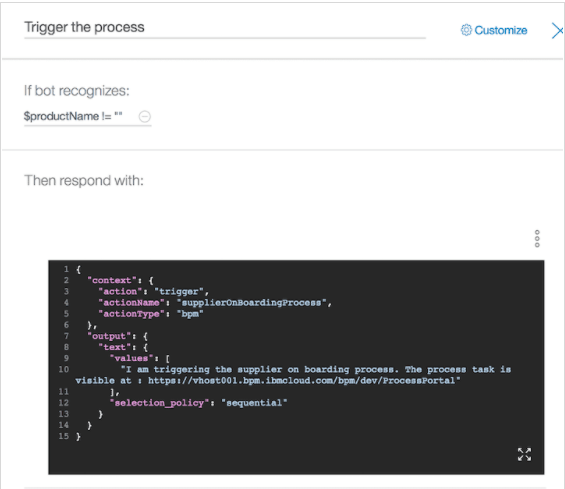
When all the parameters are set, the interaction sets the action to trigger so that the broker call can perform the SOAP call to the service.
Use the API
To use the API, you need the service credentials and the tool to perform an HTTP request. For detailed instructions, check it out here.
That culminates our tutorial on building a custom rule-based chatbot for an IT support team by using IBM Watson Assistant.
Deploying Your Watson Assistant to Different Channels
Now that the chatbot has been built, you can integrate your Watson Assistant with any of your custom channels like web or mobile apps.
In order to integrate your Watson Assistant into a custom web/mobile app, you can choose the webchat feature. The webchat creates a widget that is hosted by IBM on the IBM Cloud platform so no maintenance or additional costs are incurred by you.
Go to the Integrations tab of Watson Assistant and click on Add Integration:

Click the Web Chat integration option as shown below:

And now upon scrolling down, you will find a Javascript snippet of your hosted web widget.


Next, you copy this snippet (as shown above) and paste it into your web application’s HTML page. You will save your file and reopen the page. Upon refreshing the page, you should be able to see your webchat widget of your Watson Assistant at the bottom of your screen.
Additionally, Watson Assistant lets us customize your virtual assistants to enable you to abide by your company’s brand standards and design guidelines. Feel free to reach out to us at Technology Rivers if you need any help in programmatically customizing your Watson Assistants to redesign your webchat widget entirely, instead of using the out-of-the-box option.
So there you have it – a custom rule-based Watson Assistant chatbot!
Key Takeaways
In this tutorial, we learned how to build and deploy a custom rule-based chatbot using IBM Watson Assistant.
We used the IBM Watson Assistant service to build our rule-based chatbot from scratch.
Additionally, we briefly learned about IBM Watson and its history, and its milestones in advancing AI for smart business solutions.
Are you looking to upgrade your business and improve your customer relations? Technology Rivers can help! Just reach out to us and feel free to engage with us through our LinkedIn or Facebook Page.


