Blogs » Building a Custom Amazon Lex Bot using AWS Services
Table of Contents
The concept of a chatbot started with ELIZA that was built at MIT in 1966. However, in recent years, chatbots equipped with deep learning models and AI have emerged as the driving force for better marketing, enterprise services, knowledge management, and customer services across all business verticals.

A conversation with the ELIZA chatbot. Source: Wikipedia
When it comes to naming big conversational artificial intelligence platforms for building chatbots, it is almost unthinkable to not mention Amazon.
Amazon offers its own chatbot platform by the name of Amazon Lex. Lex follows the basic chatbot architecture adhered to by some of the big cloud-based conversational AI providers like Google Dialogflow, IBM Watson, whereby you need to create intents, entities, give sample dialogs, and ultimately build a conversation flow.
Since we have already covered how to build chatbots using Google Dialogflow, Rasa, and IBM Watson Assistant in our previous blogs, in this blog you will learn how we can employ Amazon Web Services (AWS) to build a custom chatbot for a pizza delivery service.
But before we delve into that, let’s try to learn more about Amazon and some of its AWS cloud-based products.
Technology Rivers Harnessing Amazon AWS Services
Amazon Web Services offers a broad set of cloud-based products and services including compute, cloud storage, purpose-built databases, data lakes and analytics, networking and content delivery, front-end web and mobile, developer tools, management and governance tools, Internet of Things (IoT), security, compliance and enterprise applications, game development, data processing, and warehousing. These services have and continue to empower many companies to move faster, lower their IT costs, and scale.
Over some years now, we at Technology Rivers have built an extensive repertoire of the web, mobile and custom software applications using Amazon AWS Cloud and other AWS services.
Our solutions have helped in bringing digital healthcare and medical assistance at the forefront. To name a few of those apps:
- Patient Communication and Scheduling app
- Remote Patient Monitoring app
- Patient Care Management app
- Kidney Donor mobile app
- Breast Cancer mobile app
- Medicine Adherence app
- Eddy
- PrEPme
- Sickweather – Illness Tracking app
- MileMaker – Medical Training Assessment app
Moreover, some of our AWS-powered solutions continue to provision efficient and easy accommodation, transportation and delivery services for our clients:
Additionally, with machine learning and AI becoming more ubiquitous than ever in mobile devices, we at Technology Rivers have been harnessing Amazon SageMaker to build ML models for our software solutions to make them more responsive and intelligent.
Amazon AWS Services for Building a Chatbot
Now let’s look into some of the main service components provisioned by Amazon AWS that we will be employing in this tutorial for building our custom Amazon Lex bot from scratch.
Amazon Lex
AWS’s Amazon Lex is a service for building chatbots and virtual assistants. Notably, Amazon Alexa is also powered by the same technology as that of Amazon Lex.

Source: Amazon
Amazon Lambda
AWS Lambda is a serverless Amazon computing service that lets you run code without you having to worry about managing servers, creating workload-aware cluster scaling logic, maintaining event integrations, or managing runtimes. With Lambda, you can run code for virtually any type of application or backend service – all with zero administration. Lambda functions can be written in any of your favorite programming languages including Node.js, Python, Go, Java, and many more. It also provisions serverless tools such as AWS SAM or Docker CLI, for developers to build, test, and deploy their functions.

How Amazon Lambda works. Source: Amazon
How to Build a Lex Bot using Amazon Lex and Amazon Lambda
Now, we will demonstrate how you can use Amazon Lex to create a custom bot that can order pizzas for customers. You will learn how to configure this bot by adding a custom intent called OrderPizza, defining custom slot types, and defining the slots required to make a pizza order (pizza crust, size, etc.)
Creating a Lambda function
First, you will create a Lambda function which fulfills a pizza order. Let’s specify this function in your Amazon Lex bot, which we will create later in the blog.
To create a Lambda function
- Sign in to the AWS Management Console and open the AWS Lambda console
- Choose Create function.
- On the Create function page, choose Author from scratch.
Do the following:
a. Type the name (PizzaOrderProcessor).
b. For the Runtime, choose the latest version of Node.js.
c. For the Role, choose Create new role from template(s).
e. Enter a new role name (PizzaOrderProcessorRole).
f. Choose Create function. - On the function page, do the following:
In the Function code section, choose Edit code inline, and then copy the following Node.js function code and paste it in the window and then hit Save.
'use strict';

// Close dialog with the customer, reporting fulfillmentState of Failed or Fulfilled ("Thanks, your pizza will arrive in 20 minutes")
function close(sessionAttributes, fulfillmentState, message) {
return {
sessionAttributes,
dialogAction: {
type: 'Close',
fulfillmentState,
message,
},
};
}

// --------------- Events -----------------------

function dispatch(intentRequest, callback) {
console.log(`request received for userId=${intentRequest.userId}, intentName=${intentRequest.currentIntent.name}`);
const sessionAttributes = intentRequest.sessionAttributes;
const slots = intentRequest.currentIntent.slots;
const crust = slots.crust;
const size = slots.size;
const pizzaKind = slots.pizzaKind;

callback(close(sessionAttributes, 'Fulfilled',
{'contentType': 'PlainText', 'content': `Okay, I have ordered your ${size} ${pizzaKind} pizza on ${crust} crust`}));

}

// --------------- Main handler -----------------------

// Route the incoming request based on intent.
// The JSON body of the request is provided in the event slot.
exports.handler = (event, context, callback) => {
try {
dispatch(event,
(response) => {
callback(null, response);
});
} catch (err) {
callback(err);
}
};
Test the Lambda function
In the console, test the Lambda function by using sample event data to manually invoke it.
To test the Lambda function:
- Sign in to the AWS Management Console and open the AWS Lambda console
- On the Lambda function page, choose the Lambda function (PizzaOrderProcessor).
- On the function page, in the list of test events, choose Configure test events.
- On the Configure test event page:
a. Choose Create new test event.
b. In the Event name field, enter a name for the event (PizzaOrderProcessorTest).
c. Copy the following Amazon Lex event into the window and hit Create.
{
"messageVersion": "1.0",
"invocationSource": "FulfillmentCodeHook",
"userId": "user-1",
"sessionAttributes": {},
"bot": {
"name": "PizzaOrderingApp",
"alias": "$LATEST",
"version": "$LATEST"
},
"outputDialogMode": "Text",
"currentIntent": {
"name": "OrderPizza",
"slots": {
"size": "large",
"pizzaKind": "meat",
"crust": "thin"
},
"confirmationStatus": "None"
}
}

AWS Lambda creates the test event when you go back to the function page. Choose Test and Lambda runs your Lambda function.
In the result box, choose Details. The console displays the following output in the Execution result pane.
{
"sessionAttributes": {},
"dialogAction": {
"type": "Close",
"fulfillmentState": "Fulfilled",
"message": {
"contentType": "PlainText",
"content": "Okay, I have ordered your large meat pizza on thin crust."
}
}
Create a chatbot
Now, you will create a Lex bot that handles pizza orders for your customers. Create the PizzaOrderingBot bot for now. You will add an intent, an action that the user wants to perform, for the bot later.
To create the bot
- Sign in to the AWS Management Console and open the Amazon Lex console
- If you are creating your first bot, choose Get Started. Otherwise, choose Bots, and then choose Create.
- On the Create your Lex bot page, choose Custom bot and provide the following information:
Bot name: PizzaOrderingBot
Language: Choose the language and locale for your bot.
Output voice: Salli
Session timeout: 5 minutes.
COPPA: Choose the appropriate response.
User utterance storage: Choose the appropriate response. - Choose Create.
The console sends Amazon Lex a request to create a new bot. Amazon Lex sets the bot version to $LATEST. After creating the bot, Amazon Lex shows the bot Editor tab:

Create an intent
Now, let’s create the OrderPizza intent, an action that the user wants to perform using the bot.
To create an intent
- In the Amazon Lex console, choose the plus sign (+) next to Intents (as shown above), and then choose Create new intent.
- In the Create intent dialog box, type the name of the intent (OrderPizza), and then choose Add.
The console sends a request to Amazon Lex to create the OrderPizza intent.
Create slot types
Next, let’s create the slot types, also known as parameter values, for the OrderPizza intent to use.
To create slot types
- In the left menu, choose the plus sign (+) next to Slot types (as shown in the image above).
- In the Add slot type dialog box, add the following:
- Slot type name – Crusts
- Description – Available crusts
- Choose Restrict to Slot values and Synonyms
- Value – Type thick. Press tab and in the Synonym field type stuffed. Choose the plus sign (+). Type thin and then choose the plus sign (+) again.
- The dialog should look like this:

4. Choose Add slot to intent.
5. On the Intent page, choose Required. Change the name of the slot from slotOne to crust. Change the prompt to What kind of crust would you like?
6. Repeat step 1 through step 4 using the values given in the table below:

Configure the intent
Now, let’s configure the OrderPizza intent to fulfill a user’s request to order a pizza.
To configure an intent
- On the OrderPizza configuration page, configure the intent as follows:
- Sample utterances – Type the following strings. The curly braces {} enclose slot names.
– I want to order pizza please
– I want to order a pizza
– I want to order a {pizzaKind} pizza
– I want to order a {size} {pizzaKind} pizza
– I want a {size} {crust} crust {pizzaKind} pizza
– Can I get a pizza please
– Can I get a {pizzaKind} pizza
– Can I get a {size} {pizzaKind} pizza - Lambda initialization and validation – Leave the default setting.
- Confirmation prompt – Leave the default setting.
- Fulfillment – Perform the following tasks:
– Choose AWS Lambda function.
– Choose PizzaOrderProcessor.
– If the Add permission to Lambda function dialog box is shown, choose OK to give the OrderPizza intent permission to call thePizzaOrderProcessor Lambda function.
– Leave None selected.
- Sample utterances – Type the following strings. The curly braces {} enclose slot names.
The intent should look as follows:

Configure the chatbot
Now you will learn how to configure error handling for the PizzaOrderingBot bot.
- Navigate to the PizzaOrderingBot bot. Choose Editor. and then choose Error Handling.

2. Use the Editor tab to configure bot error handling.
- Information you provide in Clarification Prompts maps to the bot’s clarificationPrompt configuration.
When Amazon Lex can’t determine the user intent, the service returns a response with this message. - Information that you provide in the Hang-up phrase maps to the bot’s abortStatement configuration.
If the service can’t determine the user’s intent after a set number of consecutive requests, Amazon Lex returns a response with this message. - Leave the defaults.
Build and Test the Bot
This brings us to the most critical step in any chatbot development process – ascertaining that the bot works as intended, by building and testing it.
To build and test the bot
- To build the PizzaOrderingBot bot, choose Build.
Upon doing that, Amazon Lex builds an ML model for the chatbot in the background. When testing the bot, the Amazon console uses the runtime API to send the user input back to Amazon Lex. Amazon Lex then uses the built model to interpret the given user input. This process will take some time to complete the build. - To test the bot, in the Test Bot window, start interacting with your Amazon Lex bot.
For example, you might say or type:

Alternatively, you can use the sample utterances that you configured in theOrderPizza intent to test the bot. For example, the following is one of the sample utterances that you configured for the PizzaOrder intent:
I want a {size} {crust} crust {pizzaKind} pizza
To test it, type the following:
I want a large thin-crust cheese pizza
Inspecting the response
Underneath the chat window is a pane that enables you to inspect the response from Amazon Lex. The pane provides comprehensive information about the state of your bot that changes as you interact with your bot.
The contents of the pane show you the current state of the operation.
- Dialog State – The current state of the conversation with the user. It can be ElicitIntent, ElicitSlot, ConfirmIntentor Fulfilled.
- Summary – A summary is a simplified view of the dialog that keeps track of the information flow. It shows the intent name, slots and their values, along with the ones already filled.

- Detail – Shows the raw JSON response from the chatbot to give you a deeper view into the bot interaction and the current state of the dialog as you test and debug your chatbot.

Deleting the resources
It is always a recommended practice to delete the resources that you have created and clean up your account to avoid incurring more charges.
Let’s delete resources in the following order:
- Delete bot to free up intent resources.
- Delete intents to free up slot type resources.
- Delete slot types last.
How to Deploy the Amazon Lex Bot in a Custom Mobile App
Now we have demonstrated how to build your Lex bot, let’s learn how to integrate your Amazon Lex bot with your custom mobile/web applications.
You have three options for deploying and integrating the chatbot UI with a custom web app:
- Use AWS CloudFormation
- Use a prebuilt distribution library
- Use a prepackaged Vue component
Even though we have employed all the aforementioned methods into some of our solutions at Technology Rivers, in this blog we’ll demonstrate how to deploy it using the AWS CloudFormation option.
- First, you will click the Launch Stack button against the region where you will be using your chatbot:

- In the Lex Bot Configuration Parameters section:
For BotName, type your bot’s name.
Set EnableCognitoLogin to true to enable integrated user login. - In the Web Application Parameters section, complete each of the parameters.
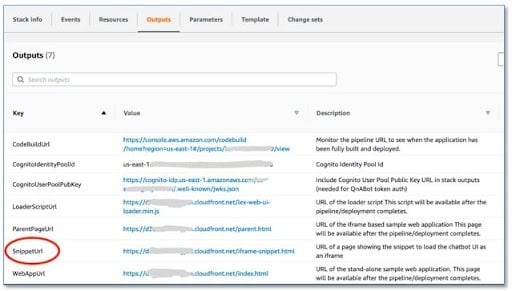
Note: It’s essential that you use your web app’s origin for WebAppParentOrigin. - After the stack has been launched by AWS CloudFormation and the status changes to CREATE_COMPLETE, you will see a link in the Outputs tab against the SnippetUrl output value, as shown below:
- Browse to the SnippetUrl page, where you will see a code snippet similar to the following that you can paste into your application:

If you are interested in learning more about the other options for integrating your Lex chatbot UI into your custom webpage and configuring it, check out the Amazon Lex UI repository or reach out to us.
So, this brings us to the end of our tutorial on how you can build a custom Amazon Lex bot from scratch using Amazon AWS services like Amazon Lambda and deploy it to your desired channel.
Wrap up
In this tutorial, we demonstrated how an Amazon Lex bot is created, built, tested, and integrated into a custom mobile application.
We used Amazon Lex and Amazon Lambda along with AWS CloudFormation to create a custom Amazon Lex bot and deploy it in a mobile application. If you’re looking to support your customer relations with an AI bot, feel free to reach out to us! Technology Rivers can help you.
References:
Create Chatbot Using Amazon Lex (Tutorial)
Amazon Lex
AWS Amplify now supports AI powered chatbots with Amazon Lex


